
If you’ve been googling “watercolor techniques for beginners” because you want your painting to look intentional (not like a puddle with potential)… I got you. Way back when, I did the same thing, but search engines weren’t nearly as helpful as they are now. YouTube was just for inside jokes, and artists were not thinking about recording their process. It’s different now, PTL. You can find thousands of videos and tutorials to help hone your creativity.
Abd speaking of videos… I demo all of this inside a full YouTube video—
Keep reading for the watercolor techniques that show up again and again in paintings that look clean, soft, and “professional.”
The 3 Basic Watercolor Techniques (Beginner-Friendly + Powerful)
When people ask “How do I start painting with watercolors,” they usually want two things:
- Watercolor blending techniques that create pretty soft washes
- A way to fix watercolor mistakes when things get too dark or muddy
And once you master these three techniques, you’ll be able to do both!
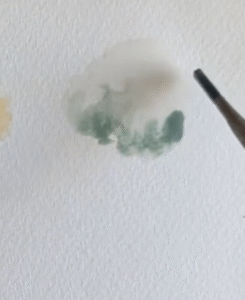
1) Wet-on-Wet Watercolor (for soft blends + dreamy washes)
Wet-on-wet watercolor means you’re putting wet paint onto wet paper. It’s one of the most useful watercolor blending techniques for beginners because it creates natural gradients and soft edges.
What the wet-on-wet technique is best for:
- Backgrounds
- Skies
- Loose florals
- Anywhere you want soft blends
How to do the wet-on-wet watercolor technique (simple steps)
- Use clean water to wet the area of your paper.
- Pick up paint (make sure it, too, is wet and drippy)
- Drop the color into the wet area on your paper, and let it spread.
That spreading is the whole point—this technique gives you those soft, glowy blends that make watercolor feel like watercolor.
IMPORTANT tip: If your paint isn’t moving much, your paper may not be wet enough. If it’s exploding everywhere, it may be too wet. (The YouTube video shows what each stage looks like.)
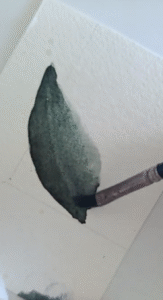
2) Wet-on-Dry Watercolor (for details, crisp edges, and control)
Wet-on-dry watercolor is wet paint on dry paper. This is where you get control—clean lines, sharper shapes, and details that don’t bloom out.
What the wet-on-dry technique is best for
- Petals and leaf shapes
- Lettering
- Outlines and edges
- Portraiture
- Architecture
- Any time you want your painting to look more defined
How to do wet on dry watercolor (simple steps)
- Make sure the paper is dry (or at least the spot you’re painting is dry).
- Load your brush with paint (the paint has to be wet and drippy).
- Paint your shape—your edges will stay crisp.
IMPORTANT tip: If your paint is too dry, it’ll feel like you’re painting with dry paint (almost like acrylics). There’s a balance of too wet paint and too dry paint, but you won’t know how much water your paint will need until you start painting. Do a few light strokes, and if it’s super brushy and feels hard to spread, you’ll need to add more water to your paint.
Wet-on-Wet vs Wet-on-Dry: Which One Should You Use?
If you’ve ever googled wet-on-wet vs. wet-on-dry, here’s the easy rule:
- Use wet-on-wet watercolor when you want soft blends, gentle transitions, and atmospheric effects.
- Use wet-on-dry watercolor when you want control, detail, and cleaner edges.
Most paintings that look polished use both: wet-on-wet for soft areas + wet-on-dry for details on top.
This combo is one of the fastest ways to make watercolor look professional.
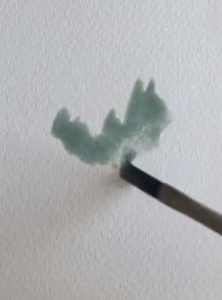
3) Watercolor Lifting Technique (your “oops” eraser and highlight maker)
Let’s talk about the technique that saves beginners from absolutely throwing e-v-e-r-y-t-h-i-n-g away—
The lifting technique is when you remove paint from the paper—either while it’s wet or after it dries.
So if you’ve ever asked:
- What is lifting in watercolor?
- How to lift watercolor?
- How to fix watercolor mistakes?
…this is it.
How to lift watercolor (two ways)
If the paint is still wet:
- Blot gently with a paper towel or sponge to lift color and create highlights.
If the paint is dry:
- Wet a clean brush, gently scrub the area lightly, then blot with a paper towel.
Important: Don’t over-scrub. Too much lifting can damage the paper and make things look rough.
Lifting is also a great fix if your painting is starting to look too heavy—especially if you’ve “overwatered” your paper with paints and water, and it’s looking muddy and gross.
10-Minute Practice (How to Paint Watercolor Flowers)
Here’s a beginner-friendly exercise using all three techniques:
- Draw a simple flower (a daisy shape is perfect).
- Paint the first layer wet-on-wet to practice soft blends.
- Let it dry.
- Add petal definition wet-on-dry for crisp edges.
- Use the watercolor lifting technique to pull out a highlight or fix one spot that got too dark.
This mini exercise hits the exact skills that help watercolor look cleaner, softer, and more intentional.
Ready for the next step?
This article gives you a solid start, but if you want to really understand:
- How wet should your paper be (and when)
- How much water should you mix into your paint
- Why do blends sometimes turn muddy
- How to layer without disturbing what’s underneath
Join Watercolor Foundations.
These (and more) are exactly what I teach inside Watercolor Foundations. These techniques become second nature, and your paintings stop feeling like a guessing game. The course helps you go from “a beginner trying random things” to a confident painter with repeatable results.


")


